The FPV world has a clear split. On one side, DJI’s Avata 2 delivers a polished, plug-and-play experience with excellent video and almost zero setup. On the other, traditional FPV gives you total control over every component, from frame choice to PID tuning, with performance that no off-the-shelf cinewhoop can match.
This isn’t a “which is better” debate — it’s a “which fits your goals” question. I’ve flown both extensively, and the honest answer depends on what you actually want out of FPV. Content creation? Racing? Freestyle in abandoned buildings? Each path serves different pilots. Let’s break it down so you can choose with confidence.
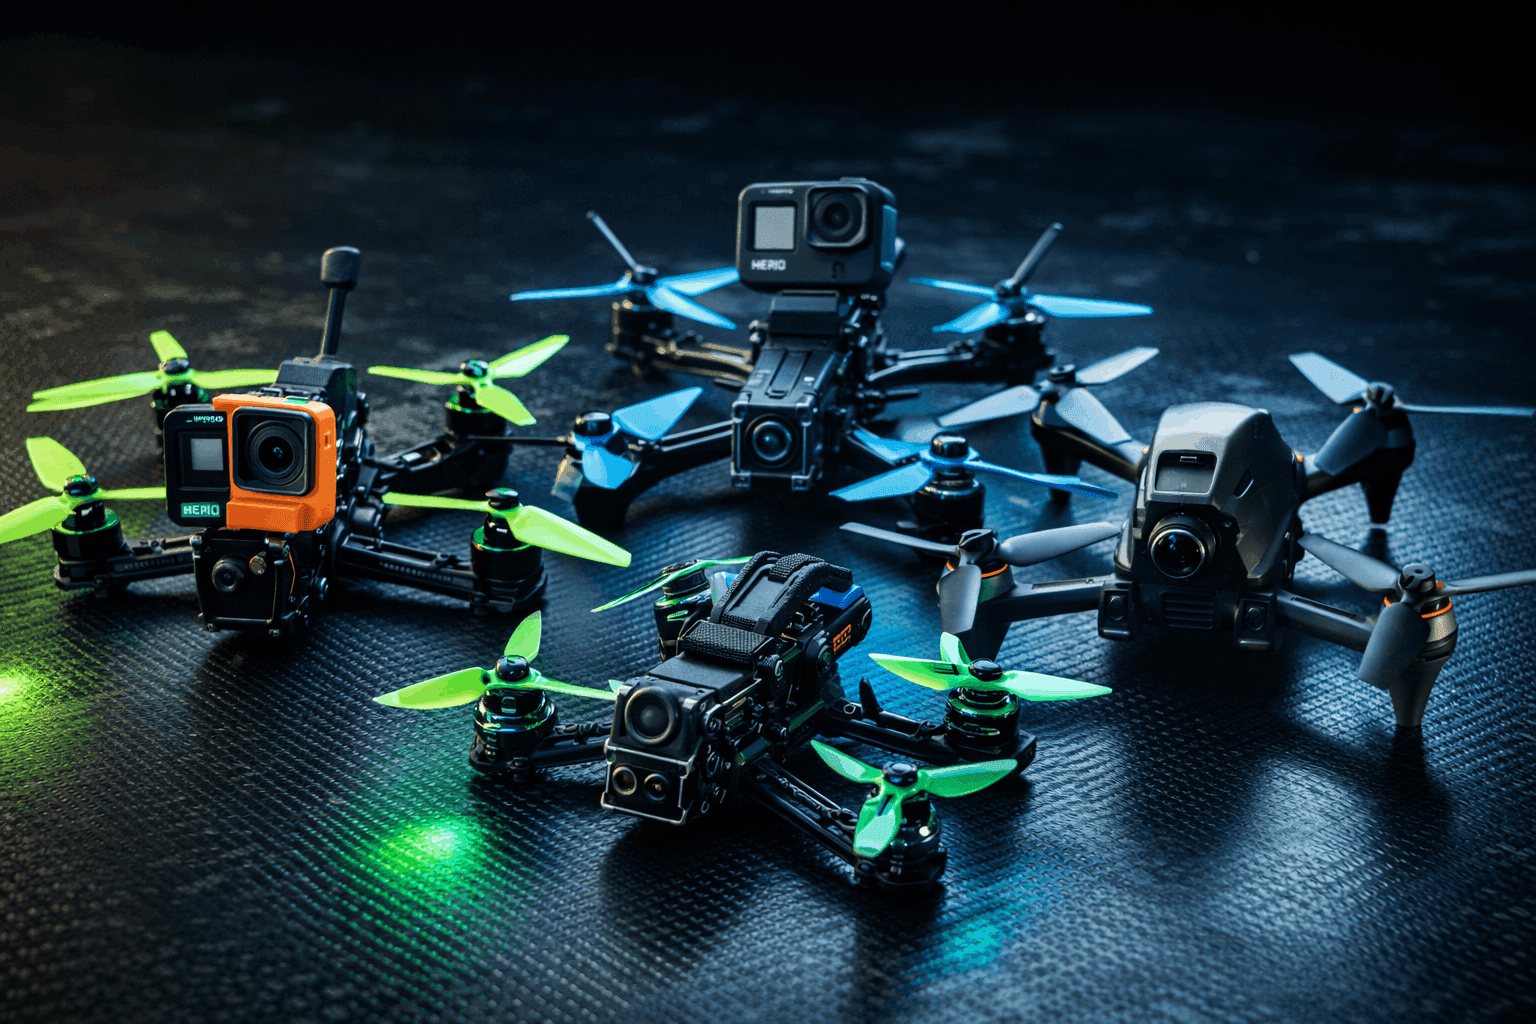
Two Different Philosophies
The DJI Avata 2 and a custom-built 5” freestyle quad aren’t competing products — they’re different tools designed for different jobs. Understanding that distinction up front saves you from buying the wrong thing.
The Avata 2 approach is integrated and consumer-focused. DJI controls the entire stack: drone, goggles, controller, firmware. You get a tight, polished experience where everything works together from the first power-on. The trade-off is that you’re locked into DJI’s decisions about performance, tuning, and hardware. You can’t swap motors, change the frame geometry, or tune PIDs. What DJI ships is what you fly.
The traditional FPV approach is modular and hobbyist-driven. You pick every component — frame, motors, flight controller, ESC, VTX, receiver, camera — and assemble them into exactly the machine you want. Racing build? Freestyle ripper? Long-range cruiser? Same hobby, wildly different builds. The trade-off is knowledge investment: you need to understand what you’re buying and how to make it work.
Neither approach is wrong. They’re different value propositions. Avata 2 isn’t “dumbed down” — it’s streamlined. Traditional FPV isn’t “outdated” — it’s flexible.
DJI Avata 2: What It Actually Delivers
The Real Strengths
Out-of-box experience is genuinely impressive. Charge the battery, bind the controller, update firmware, fly. You’re airborne in under an hour with zero soldering, zero Betaflight configuration, zero troubleshooting. For someone who just wants to experience FPV immersion without becoming an electronics technician, this is a massive win.
Video quality punches well above its weight. The 1/1.3” CMOS sensor shoots 4K/60fps with 10-bit D-Log M color mode for serious color grading flexibility. The 155° super-wide FOV creates that visceral “you are there” perspective that makes FPV content so compelling. RockSteady 3.0+ and HorizonSteady stabilization produce smooth, usable footage straight out of the drone — no GoPro needed, no extra weight, no additional $400+ expense.
For content creators especially, this is where the Avata 2 shines. You get cinematic-grade stabilized footage from a 377g package without mounting a separate action camera. If your goal is YouTube content, real estate walkthroughs, or social media clips, the integrated camera system is hard to beat.
Flight time changes the session dynamics. DJI rates the Avata 2 at 23 minutes max flight time. Real-world, expect 15-18 minutes depending on how aggressively you fly and wind conditions. That’s still roughly double what you’ll get from a typical 5” freestyle quad on a 1300mAh 6S LiPo. Fewer battery swaps means longer creative sessions and less time standing around.
The DJI O4 video transmission system is excellent. 13km max range (FCC), 60Mbps bitrate, and latency as low as 24ms at 1080p/100fps through the DJI Goggles 3. The link quality and reliability are best-in-class. You won’t experience the breakup and static that analog pilots deal with, and the image quality in the goggles is sharp enough to fly confidently through tight gaps.
Safety features lower the barrier to entry. The built-in prop guards protect both the drone and whatever it hits. Normal and Sport modes provide altitude hold, speed limiting, and position hold via downward and backward visual positioning sensors. Beginners get training wheels that actually work. The Emergency Brake and Hover function on the RC Motion 3 is a genuine lifesaver when things go sideways.
The Real Limitations
Speed and agility hit a hard ceiling. Max speed is 97 km/h (60 mph) in Manual mode — and that requires the separate FPV Remote Controller 3 ($159). With the Motion Controller in Sport mode, you’re limited to about 57 km/h (36 mph). A tuned 5” racing quad hits 150-200+ km/h without breaking a sweat. The prop guards add drag and weight that you simply can’t remove without voiding your warranty and destroying the structural integrity of the frame. For racing or aggressive freestyle, the Avata 2 isn’t in the conversation.
No real customization. You can’t change motors, swap frames, adjust PIDs, or modify the flight characteristics in any meaningful way. DJI’s tuning decisions are final. If you don’t like how it flies, your options are limited to the three flight modes DJI provides. For pilots who want their quad to feel exactly the way they want it, this is a deal-breaker.
Ecosystem lock-in is real and expensive. The Avata 2 requires DJI goggles — Goggles 3, Goggles N3, Goggles 2, or Goggles Integra. The Fly More Combo with Goggles 3 and 3 batteries runs $1,199. You can’t use a RadioMaster TX16S or any third-party controller (Manual mode requires DJI’s own FPV Remote Controller 3). Your investment only works within DJI’s walled garden.
The flip side: if you later build a custom quad with a DJI O4 Air Unit, those same goggles work perfectly. So the lock-in isn’t completely dead-end — but it does limit your options to DJI-compatible video systems only.
Crash repairs sting. The Avata 2’s plastic frame is tougher than it looks, but when it breaks, replacement parts and DJI service costs add up fast. A bad crash can easily cost $50-150+ depending on what breaks. Compare that to a traditional quad where a busted arm costs $5-15 in carbon fiber. For aggressive pilots who crash frequently, the economics favor traditional builds heavily.
No obstacle avoidance. Despite what some people assume, the Avata 2 does not have obstacle avoidance sensors. It has downward and backward visual positioning sensors for hovering stability — that’s it. You still need to fly with full spatial awareness, especially indoors or in tight environments.
Traditional FPV: What It Actually Delivers
The Real Strengths
Performance range is staggering. From tiny whoops you fly around your living room to 7” long-range builds that cruise 10+ km out, traditional FPV covers every use case. A tuned 5” freestyle quad like the iFlight Nazgul Evoque F5 delivers raw power and agility that no consumer cinewhoop can match. You can build for racing, freestyle, cinematic, long-range, or any hybrid in between.
Customization is the entire point. Choose your frame, motors, props, flight controller stack, video system, radio link, and camera. Tune PIDs in Betaflight until the quad responds exactly how you want. Dial in your rates for your flying style. This level of control is what separates a good freestyle pilot from a great one — the quad becomes an extension of your muscle memory.
Repair costs are dramatically lower. Broke a motor in a bando session? $15-25 for a replacement. Snapped an arm? $20-40 for a new frame, or $5-15 for just the arm on modular designs. Chewed up props? A pack costs $3-8. You fix everything yourself with basic soldering skills and common tools. This matters enormously when you’re pushing limits and crashing regularly — because in freestyle, you will crash regularly.
Ecosystem freedom. Use any radio transmitter — a RadioMaster Pocket, a TX16S, a TBS Tango. Run ELRS or Crossfire for your control link. Pick between analog, DJI, HDZero, or Walksnail for video. Choose goggles from Skyzone, Fatshark, DJI, or HDZero depending on your system. No single company controls your upgrade path.
Budget flexibility is genuine. A complete beginner setup under $500 is absolutely possible with analog video, ELRS, and a budget BNF quad. Want premium? You can spend $1,500+ on a top-tier digital build with carbon frame, premium motors, and DJI O4. The range exists for every budget.
The Real Limitations
The learning curve is steep and front-loaded. Before your first real flight, you need to understand component compatibility, build the quad (or at least configure a BNF), set up Betaflight, bind your receiver, configure your radio, and test everything. A BNF setup takes 2-4 hours of configuration. A full build takes 8-20+ hours for a first-timer. The FPV simulator time you should log before flying real hardware adds days or weeks to the timeline.
This is the biggest barrier. Many people buy traditional FPV gear and never fly because they get stuck in the configuration phase. If you don’t enjoy problem-solving and tinkering, this path will frustrate you.
Flight time is short. A typical 5” freestyle quad on a 1300-1500mAh 6S LiPo gives you 4-6 minutes of aggressive flying, or 6-8 minutes of cruising. You burn through batteries fast. A serious session needs 6-10 packs minimum, plus a field charger. Battery management — charging, storage voltage, safety — becomes a significant part of the hobby.
Video quality requires extra investment. Your FPV camera feed (analog or digital) is for flying, not for sharing. If you want shareable cinematic footage, you’re mounting a GoPro or similar action camera — adding $300-500+ in cost and 150-170g in weight. The footage will be excellent, but it’s an additional expense and complexity layer the Avata 2 doesn’t require.
Analysis paralysis is real. With thousands of component combinations possible, choosing the “right” parts overwhelms many newcomers. Which FC stack? What motors? Which VTX? Compatible with what firmware version? The community is helpful, but the sheer volume of options intimidates beginners. A curated buying guide helps, but the decision load is still heavy compared to “buy Avata 2 combo.”
Head-to-Head: The Numbers
| Factor | DJI Avata 2 | Traditional 5” FPV |
|---|---|---|
| Time to First Flight | Under 1 hour | 4-20+ hours |
| Max Speed | 97 km/h (60 mph) | 150-200+ km/h |
| Flight Time (Real-World) | 15-18 min | 4-8 min |
| Crash Repair Cost | $50-150+ | $5-50 |
| Video Quality (Onboard) | 4K/60fps stabilized | Requires GoPro ($300+) |
| FPV Feed Quality | 1080p/100fps, 24ms | Varies (720p-1080p) |
| Customization | None | Unlimited |
| Complete Setup Cost | $729-1,199 | $300-1,200+ |
| Ecosystem | DJI only | Open/multi-brand |
| Skill Ceiling | Moderate | Very high |
A few notes on the numbers worth expanding:
Flight time context matters. The Avata 2’s 15-18 real-world minutes feels luxurious compared to traditional. But traditional pilots carry 6-10 batteries and swap in seconds. Over a 2-hour session, both approaches yield roughly similar total flight time — the rhythm is just different. Long, relaxed flights vs. short, intense rips.
Cost comparison needs nuance. The Avata 2 Fly More Combo at $1,199 includes drone, 3 batteries, Goggles 3, and RC Motion 3. A comparable traditional digital setup (BNF quad + DJI O4 Air Unit + DJI Goggles + ELRS radio + batteries + charger) runs $900-1,300. The prices overlap more than people think. Where traditional saves money is at the budget end (analog setup under $500) and in ongoing repair costs.
Who Should Buy the DJI Avata 2
Content creators focused on footage, not flying. If your end goal is cinematic FPV content for clients, YouTube, or social media, and you don’t care about pushing performance limits, the Avata 2 delivers excellent 4K stabilized footage with zero hassle. Real estate walkthroughs, event coverage, travel content — this is where it excels.
People who want FPV immersion without the hobby. You want to experience the thrill of flying FPV. You don’t want to learn Betaflight, solder joints, or diagnose why your VTX isn’t binding. The Avata 2 respects your time and gets you flying fast.
Beginners who value safety and simplicity. The prop guards, altitude hold, speed limiting, and Emergency Brake genuinely reduce the risk of expensive crashes during the learning phase. Pair it with the Motion Controller and you’re flying with minimal stick skills. It’s the lowest-frustration entry point into FPV that exists.
The Avata 2 is NOT for: competitive racers (too slow), aggressive freestyle pilots (not agile enough), tinkerers who enjoy building (nothing to build), or pilots who crash hard and often (repair costs add up fast).
Who Should Choose Traditional FPV
Racing pilots. If you want to compete in MultiGP events or just rip gates with friends, there’s no substitute for a purpose-built racing quad. The speed, agility, and response time of a tuned racing drone are in a completely different league from any cinewhoop.
Freestyle pilots. Bando sessions, park rips, power loops, and split-S through gaps — freestyle demands a quad that responds instantly to your inputs and can take repeated beatings. Traditional 5” builds deliver this. The Avata 2 doesn’t.
Builders and tinkerers. For many FPV pilots, building the quad is the hobby. Choosing components, soldering a clean stack, configuring firmware, and tuning until it feels perfect — that’s deeply satisfying in a way that unboxing a consumer product never replicates.
Budget-conscious pilots. A solid beginner setup under $500 with analog video and ELRS gets you flying traditional FPV for less than the cheapest Avata 2 combo. And when you crash (you will), repairs cost a fraction of what DJI charges.
Traditional FPV is NOT for: people with very limited free time who just want to fly, anyone uncomfortable with technical problem-solving, or pilots who need polished video from day one without extra gear.
Popular traditional FPV starter quads:
Check iFlight Nazgul Evoque F5 on Amazon
Check Emax Tinyhawk 3 on Amazon
The Hybrid Path: Why Many Pilots Own Both
Here’s what experienced pilots rarely tell beginners: many of us own both. The Avata 2 (or a similar DJI cinewhoop) handles cinematic work, indoor flights, and situations where reliability matters. A custom 5” comes out for freestyle sessions and pure flying enjoyment. They’re complementary tools, not competitors.
DJI digital on custom frames is particularly worth considering. A DJI O4 Air Unit mounted on a custom freestyle frame gives you DJI’s excellent video transmission and recording quality with fully customizable flight performance. If you already own DJI Goggles 3 from an Avata 2 purchase, your goggles work with this build too — making the transition smoother and the goggles investment more versatile.
Check DJI O4 Air Unit on Amazon
A common progression: Start with Avata 2, fall in love with FPV, realize you want more performance → add a traditional 5” build. Your stick skills transfer directly. Your DJI goggles work with O3/O4 Air Units on custom builds. The Avata 2 becomes your content/casual drone while the custom quad becomes your performance machine.
Making Your Decision
Skip the tribalism. Both paths lead to genuine FPV immersion. Here’s a quick decision framework:
Choose Avata 2 if you value convenience over customization, want quality footage without extra gear, have the budget for the combo, don’t need racing performance, and prefer spending time flying over time building.
Choose traditional FPV if you want maximum performance, enjoy the building/tuning process, need budget flexibility, plan to race or do aggressive freestyle, and don’t mind investing time to learn.
Choose both if you want cinematic capability AND racing/freestyle performance, and your budget allows it.
Still unsure? Start with an FPV simulator and a budget controller. Spend a few weeks practicing. You’ll know quickly whether you want the simplicity of the Avata 2 or the depth of traditional FPV. The $50-80 invested in a simulator-compatible radio is the cheapest way to figure out your path before committing hundreds more.
FAQ
Can I race the DJI Avata 2 competitively?
No. The 97 km/h top speed (Manual mode only, which requires the separately sold FPV Remote Controller 3) can’t compete with racing quads pushing 150-200+ km/h. You can fly through gates for practice, but you won’t be competitive at any MultiGP event. If racing is the goal, build or buy a dedicated racing quad.
How hard is traditional FPV compared to the Avata 2?
The actual flying is comparable — stick skills are stick skills, and both require practice. The difference is everything around the flying. With Avata 2, you unbox and fly. With traditional, you need to understand component selection, configuration, and Betaflight setup. Budget 4-8 hours for a BNF setup, 15-30 hours for a first build. The flying itself? Similar learning curve either way, especially if you train on a simulator first.
Which is cheaper long-term?
Traditional FPV, for most pilots. Per-crash repair costs of $5-30 vs $50-150+ add up fast if you’re pushing limits. Initial investment can be comparable ($500-1,200 for either approach at mid-range), but the ongoing maintenance cost clearly favors traditional builds. The exception: very conservative flyers who rarely crash will spend less overall on Avata 2.
Can I switch from Avata 2 to traditional later?
Yes, and it’s a natural progression. Your flying skills transfer completely. Your DJI Goggles work with any quad running a DJI O3 or O4 Air Unit, so that investment carries over. Your DJI controller won’t work with traditional receivers — you’ll need a new radio transmitter. Many pilots keep the Avata 2 for content work and add a traditional quad for performance flying.
Do professional FPV pilots use DJI or traditional?
Both, depending on the job. Commercial cinematography where reliability and consistent footage matter? DJI products are extremely common — the Avata 2 and custom builds with DJI O4 Air Units both see heavy professional use. Racing content, aggressive freestyle, and creative flying? Traditional builds dominate. Most working pros own multiple platforms and choose based on the shoot requirements.
What about DJI discontinuing the Avata line?
Legitimate concern with any proprietary ecosystem. DJI has discontinued product lines before. If Avata 2 gets dropped, your goggles still work with other DJI-compatible drones and Air Units, but battery and frame part availability may shrink. Traditional FPV uses open-source firmware (Betaflight) and standardized components — no single company’s product decisions can strand your entire setup.
This guide contains affiliate links. Purchases through our links earn us a commission at no extra cost to you, supporting our testing and content creation.